
Setting Up Apache as a Reverse Proxy Server (RPS) on WebLogic 10.3.x
This postprovides information for installing, configuring, testing and troubleshooting when using Apache Reverse Proxy Server with WebLogic 10.3.x
1. User accesses the PeopleSoft application, from browser, by using a URL containing the hostname and port# of the RPS.
Example: http://ApacheHost:8080/ps/signon.html
2. The user request is routed through the Apache RPS and then forwarded to the WebLogic plug-in.
The plug-in then evaluates the request and forwards it to the WebLogic PIA.
3. The WebLogic PIA then processes the request and returns a response via the plug-in to the Apache RPS.
You can configure Apache RPS to forward requests to either one WebLogic PIA or to multiple WebLogic PIA's. If using multiple WebLogic PIA's, the PIA's can be in a 'WebLogic Cluster', or they can be independent PIA's. And they can be on the same machine or multiple machines.
The transmission of requests from Apache RPS to the WebLogic PIA(s) can be completed using either http or https protocol.
Below are some common reasons for using Apache RPS:
1. When external users needs to access the PeopleSoft application, an Apache RPS is sometimes installed in the 'DMZ' in order to add a 'layer of protection' between the external users and the PeopleSoft web server.
2. In cases where there are multiple WebLogic PIA's, Apache RPS may be used to distribute incoming http requests to the multiple PIA's (instead of using a load balancer)
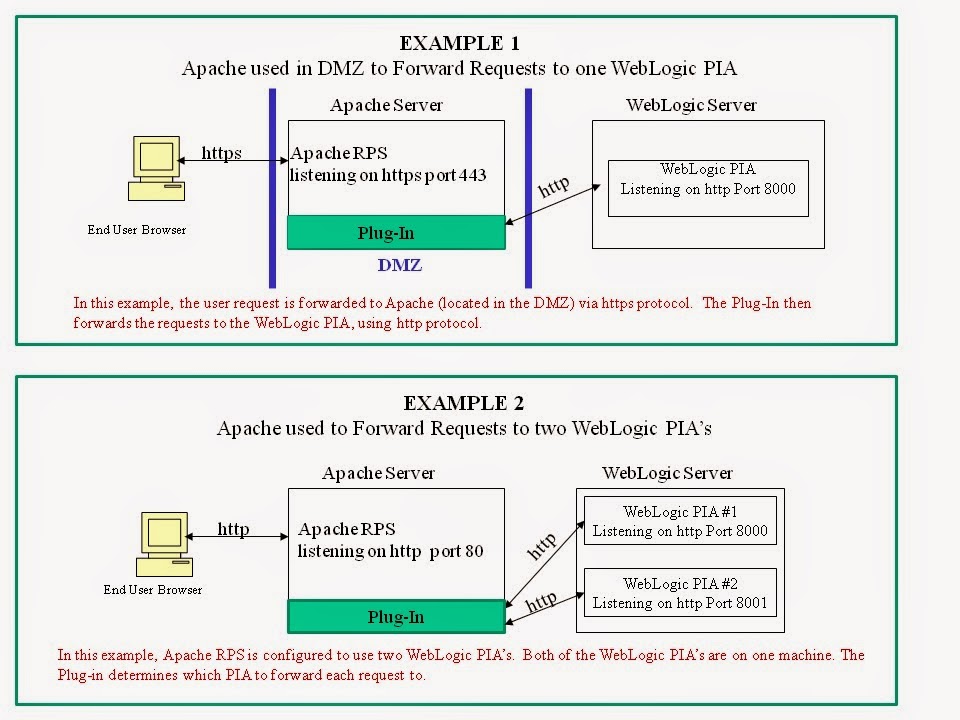
The diagrams below, show a couple examples of Apache configurations in a PeopleSoft environment. Note that this is just a couple sample configurations, but Apache can be configured in many other ways:
If you are not on the latest WebLogic Maintenance Pack and/or you need help determining what Maintenance Pack you're on, refer to the following document:
http://middlewaretimes.blogspot.com/2014/09/upgrading-weblogic-103x-for-peopletools.html
a) WebLogic Server 10g Plug-ins (previously called Plug-in version 1.0)
b) WebLogic Server 11g Plug-ins (previously called Plug-in version 1.1)
If at all possible, we recommend that you use the WebLogic 11g plug-ins, as the 10g plug-ins are being deprecated (also, note that WebLogic 11g plug-ins are required if using a SHA2 SSL certificate) However, at this time, the WebLogic 11g plug-ins are not yet available for all Operating Systems.
So we recommend that you first download the 11g Plug-Ins to check if one is available for your Operating System/Platform. If an 11g Plug-In is not available, then you will need to download the 10g Plug-ins.
Get the plug-in as follows:
a. First, get the latest WLS 11g plug-ins from Oracle Technology Network (OTN) at http://www.oracle.com/technetwork/middleware/ias/downloads/wls-plugins-096117.html.
After you go to the above site and accept the license agreement, you can click on link "Oracle WebLogic Web Server Plugins 11g" to download a zip file with the latest plug-ins
After you download the above zip file, check if it contains an Apache plug-in file for your Operating System. Example "WLSPlugin11g-64bit-Apache2.2-linux64-x86_64" is the file for Apache 2.2 on Linux
b. If there was not a 11g plug-in available for your OS, then you will need to use the 10g Plug-in (which will be covered in step#5 below)
a. Go to the following link which will open a spreadsheet: http://www.oracle.com/technetwork/middleware/downloads/fmw-11gr1certmatrix.xls
b. On the spreadsheet, go to tab "FMW on WLS - WebServers"
c. This spreadsheet shows the Apache versions supported based on the plug-in you are using.
d. Depending on the plug-in version that you are using (as determined by STEP 2 above), you will need to go to column "WebLogic Server Plug-in 1.1" (aka WebLogic11g) or go to column "WebLogic Server Plug-in 1.0" (aka WebLogic 10 g)
e. You will then see a list of all Web Servers/Versions that are supported. Check which Apache version(s) are supported, so that you know what you need to download and install.
http://www.apache.org/dist/httpd/
From the above link, you may want to click 'Current Releases' which will direct you to a HTTP Server Download page which shows best available version.
For Windows, you may wish to choose the 'binary' download file. Note that there are different files to download depending on whether or not you are installing SSL on Apache.
The following link contains additional detail on installing Apache on Windows:
http://httpd.apache.org/docs/2.2/platform/windows.html
For Unix, you need to install 'source' download file. Refer to the following link for details on installing Apache on Unix:
http://httpd.apache.org/docs/2.2/
Below are instructions for installing each plug-in version.
Instructions to Install 10g Plug-In (formerly version 1.0 Plug-in):
The 1.0 plug-in files are delivered with WebLogic 10.3.x. To get the necessary plug-in for your Apache RPS, do the following:
1. Go to the directory where you installed WebLogic (ie WL_HOME)
2. Then go to subdirectory wlserver_10.3/server/plugin/
3. Then go to the appropriate subdirectory based on the OS/Platform for your Apache RPS installation.
4. You will see several plug-in files. For Apache 2.2.x, you need to use one of the following plug-ins:
a. If using http protocol when proxying requests to WebLogic: Use file mod_wl_22.so
b. If using https protocol when proxying requests to WebLogic: Use file mod_wl128_22.so
5. After you locate the plug-in file, copy the file to the 'modules' directory in your Apache install directory. Example:
Copy mod_wl_22.so to <APACHE_HOME>/modules
Note: Another option, to get the latest plug-in file, for version 1.0, is to download it from 'My Oracle Support'. This can be done as follows:
1. First download the file as follows:
a. Log into My Oracle Support (MOS)
b. Go to the 'Patches & Updates' tab
c. In the 'Patch Search' section:
i. Enter patch#10051798
ii. Click 'Search' button
iii. The patch will be displayed. Click on the hyperlink and then click 'download' button to download the plug-in files.
2. Now, unzip the file you just downloaded and go to the appropriate directory based on your Apache OS and Apache version you are installing.
3. Extract the file for your Apache version and OS.
a. If using http protocol when proxying requests to WebLogic: Extract file mod_wl_22.so
b. If using https protocol when proxying requests to WebLogic: Extract file mod_wl128_22.so
4. Copy the file to <APACHE_HOME>/modules
Instructions to Install 11g Plug-In (formerly version 1.1 Plug-in):
a. Unzip the plug-in file (from STEP 2 above).
You might want to create a new directory (eg PlugIn11g) in <apache-install-dir>/plugins. Then unzip the plug-in file to directory 'weblogic-plugins-1.1'
b. There will be a 'README.txt' file included in the zip file. Follow the instructions in the 'README.txt' file to install the plug-in.
You will also need to refer to the README file for the next step ("How to configure Apache with WebLogic Plug-in)
Note: If using the 11g Plug-in, you may want to copy the plug-in files (from the plug-in lib directory) directly to <iApache-install-dir>/lib, as noted in the README file.
Make the following changes to the 'httpd.conf' file:
1. First, add a line to load the WebLogic plug-in file. There is a section, in httpd.conf, where all the modules are loaded. You can add a line to the end of this section, for the WebLogic plug-in module. Note that the name of plug-in file will differ depending on what plug-in version you are using (as outlined in the previous step). So add the line as follows:
-If using Plug-In version 1.1, add line:
LoadModule weblogic_module weblogic-plug-ins-1.1\mod_wl.so
-If using Plug-In version 1.0 and configuring Apache plug-in to use SSL, add line:
LoadModule weblogic_module modules\mod_wl128_22.so
-If using Plug-In version 1.0 and NOT configuring Apache plug-in to use SSL, add line:
LoadModule weblogic_module modules\mod_wl_22.so
2. Next, add an 'IfModule mod_weblogic.c' section to the end of the httpd.conf file (where the other 'IfModule' sections are). This section will contain information on how to forward incoming requests to the WebLogic server.
The following link contains information on all parameters that can be used with the Apache plug-in for WebLogic:
http://download.oracle.com/docs/cd/E12840_01/wls/docs103/plugins/plugin_params.html#wp1143055
The remainder of this section contains several sample Apache Configurations and the corresponding values to use in the 'mod_weblogic.c' section (in httpd.conf). You might want to first start out with a simple configuration (Example 1) and get that working before moving on to a more complex configuration
EXAMPLE 1: Apache configuration using one PIA (and no SSL)
In this example, Apache is proxying all requests to just one WebLogic PIA located on on web server box "wlmachine" listening on port 8000:
EXAMPLE 2: Apache configuration using two PIA's (and no SSL)
In this example, Apache is proxying requests to multiple WebLogic PIA's: Requests are being forwarded to PIA's listening on ports 8000 and 8001 on web server box "wlmachine".
Note that if you are forwarding requests to multiple PIA's, you must specify the cookie name in the Apache httpd.conf file, as in the example below. The same cookie name value must be specified in Apache configuration file (httpd.conf) and WebLogic configuration file (PS_HOME\webserv\<DOMAIN_NAME>\applications\peoplesoft\PORTAL.war\WEB-INF\weblogic.xml) for each PIA that Apache is sending requests to:
EXAMPLE 3: Apache configuration with debug logging enabled
To collect more detail on Apache activity, you can turn on debug logging, using parameters 'Debug ON' and 'DebugConfigInfo On' as in the example below. In this example, the debug information, for the plug-in, is logged to file c:/tmp/wls_plugin.log:
EXAMPLE 4: Apache configuration using two SSL-enabled PIA's
If Apache is proxying requests to an SSL-enabled PIA, then you must also use parameter "SecureProxy ON" and you need to specify the location of the trusted root CA, that Apache needs to complete the SSL handshake with the WebLogic PIA. The parameters that you use, are different, based on whether you are using plug-in 1.0 or plug-in 1.1. Below are the steps for configuring the plug-in to communicate to the WebLogic PIA via https protocol:
1. First, you will need to get the root certificate for the server certificate that the WebLogic PIA is using (this step applies for both Plug-in versions 1.0 and 1.1). If you do not have the root certificate for the WebLogic PIA, refer to the following document for instructions on how to obtain the root certificate:
http://middlewaretimes.blogspot.com/2014/09/how-to-extract-root-ca-from-server.html
At the end of this step, you should have the root certificate in a file. The contents of the root file, will look something like this:
Note: If your certificate uses both a root and intermediate certificate, then the above file should contain both: first the intermediate certificate followed by the root certificate.
2. Next, you will need to change the httpd.conf configuration.
For 10g Plug-In (ie version 1.0):
a. Place the root certificate file (from the step 1 above) in a directory within APACHE_HOME. In this example, the root file is called "root.cer" and located in <APACHE_HOME>/conf/Certs/
b. Now, add parameter 'SecureProxy ON' to the WebLogic section in httpd.conf. Also, add parameter 'TrustedCAFile and specify the location of the root certificate. Also, the WebLogic ports that you specify, will need to access https ports. Example:
For 11g Plug-In (ie version 1.1):
Place the root certificate file (from step 1 above) in an "Oracle Wallet". Below are the instructions for creating the Oracle Wallet:
1. Go to <APACHE_HOME>/weblogic-plugins-1.1/bin
2. Set the path point to a JDK6. Example
PATH = d:\WLS1033\jdk160_18\jre\bin;%PATH%
3. Set the CLASSPATH to reference the jar file in <APACHE_HOME>/weblogic-plugins-1.1/jlib /oraclepki.jar. Example
SET CLASSPATH=C:\Program Files\Apache Software Foundation\Apache2.2\weblogic-plugins-1.1\jlib\oraclepki.jar
4. Run the following command to create a wallet:
java oracle.security.pki.textui.OraclePKITextUI wallet create -wallet my-wallet -auto_login_only
5. Now add your root certificate file, to the wallet. Example:
java oracle.security.pki.textui.OraclePKITextUI wallet add -wallet my-wallet -trusted_cert -cert "C:\Program Files\Apache Software Foundation\Apache2.2\conf\Certs\root.cer" -auto_login_only
6. Now, add parameter 'SecureProxy ON' to the WebLogic section in httpd.conf. Also, add parameter 'WLSSLWallet' and specify the path location of the Oracle Wallet containing the root certificate. Also, the WebLogic ports that you specify, will need to access https ports. Example:
Note: On Linux/Unix platforms, do not use the "=" in the WLSSLWallet parameter. Example: WLSSLWallet /opt/Apache22/weblogic-plugins-1.1/bin/my-wallet/
7. When starting Apache, you'll need to make certain that the plug-in libraries are available:
For Windows, make certain that <APACHE_HOME>\weblogic-plugins-1.1 is in included in the PATH. Example:
PATH = C:\Program Files\Apache Software Foundation\Apache2.2\weblogic-plugins-1.1\lib;%PATH%
For Unix/Linux, include ${PLUGIN_HOME}/lib in the LD_LIBRARY_PATH
(other options include copying the 'lib' contents to APACHE_HOME\lib)
a. Log into WebLogic console (using url http://machine-name:port#/console/)
b. Click 'Lock & Edit' button on top left page
c. From left menu, choose Environment -> Servers
d. Click the 'PIA' hyperlink on right menu.
e. Go to tab 'Configuration' and sub-tab 'General'
f. At bottom of page, click the 'Advanced' hyperlink
g. Check box next to 'WebLogic Plug-In Enabled
h. Save change
i. Click 'Activate Changes' button on top left page
Below are steps to test the Apache configuration:
1. First you, should test direct access to the WebLogic PIA to make certain it is accessible. When you initially test, you may want to configure your WebLogic PIA to use a web profile that does NOT have an authentication domain or virtual addressing configured. (just to rule out any issues with misconfigured Web Profile).
To test direct access to the WebLogic PIA, log into the PeopleSoft application, from a browser, using WebLogic PIA/Port# in the url. Example:
http://websvr:8000/ps/signon.html
2. Next you should verify that the Apache proxy is up and running (httpd -k start). If you made any configuration changes, be sure to shut down Apache and restart it.
You can run "netstat -an" to verify that the Apache server is listening on the port that you configured for the RPS
3. Now try accessing the PeopleSoft application, via the Apache RPS. Example:
http://ApacheSvr/ps/signon.html
The instructions also include steps for installing and configuring the 'Apache HTTP Server Plug-In'. Note that we recommend you use the Apache HTTP Server Plug-In as it enhances an Apache installation by enabling WebLogic server to handle load balancing or requests that require the dynamic functionality of the WebLogic server.
OVERVIEW of Apache and Examples of how Apache can be Configured in a PeopleSoft Environment.
Apache can be used as a Reverse Proxy Server (RPS) to one or more WebLogic PIA's. When using Apache, the end user enters a browser URL containing a host name/port# that points to the RPS, not the WebLogic server. Below is the sequence of events that occur in a PeopleSoft environment using an Apache RPS:1. User accesses the PeopleSoft application, from browser, by using a URL containing the hostname and port# of the RPS.
Example: http://ApacheHost:8080/ps/signon.html
2. The user request is routed through the Apache RPS and then forwarded to the WebLogic plug-in.
The plug-in then evaluates the request and forwards it to the WebLogic PIA.
3. The WebLogic PIA then processes the request and returns a response via the plug-in to the Apache RPS.
You can configure Apache RPS to forward requests to either one WebLogic PIA or to multiple WebLogic PIA's. If using multiple WebLogic PIA's, the PIA's can be in a 'WebLogic Cluster', or they can be independent PIA's. And they can be on the same machine or multiple machines.
The transmission of requests from Apache RPS to the WebLogic PIA(s) can be completed using either http or https protocol.
Below are some common reasons for using Apache RPS:
1. When external users needs to access the PeopleSoft application, an Apache RPS is sometimes installed in the 'DMZ' in order to add a 'layer of protection' between the external users and the PeopleSoft web server.
2. In cases where there are multiple WebLogic PIA's, Apache RPS may be used to distribute incoming http requests to the multiple PIA's (instead of using a load balancer)
The diagrams below, show a couple examples of Apache configurations in a PeopleSoft environment. Note that this is just a couple sample configurations, but Apache can be configured in many other ways:
STEP 1: Check Prerequisites to Install Apache and Plug-In
Before installing the Apache and Proxy Plug-In, we recommend that you start by getting your environment on the latest WebLogic 10.3 Maintenance Pack (MP). Note that this is not mandatory, since the plug-ins are backward compatible with older WebLogic versions. But for best optimization, you should use the latest WebLogic 10.3 MP and the latest plug-in version.If you are not on the latest WebLogic Maintenance Pack and/or you need help determining what Maintenance Pack you're on, refer to the following document:
http://middlewaretimes.blogspot.com/2014/09/upgrading-weblogic-103x-for-peopletools.html
STEP 2: Determine which Apache WebLogic Plug-in Version to Use and then Download it.
Note that there are two Plug-in versions available:a) WebLogic Server 10g Plug-ins (previously called Plug-in version 1.0)
b) WebLogic Server 11g Plug-ins (previously called Plug-in version 1.1)
If at all possible, we recommend that you use the WebLogic 11g plug-ins, as the 10g plug-ins are being deprecated (also, note that WebLogic 11g plug-ins are required if using a SHA2 SSL certificate) However, at this time, the WebLogic 11g plug-ins are not yet available for all Operating Systems.
So we recommend that you first download the 11g Plug-Ins to check if one is available for your Operating System/Platform. If an 11g Plug-In is not available, then you will need to download the 10g Plug-ins.
Get the plug-in as follows:
a. First, get the latest WLS 11g plug-ins from Oracle Technology Network (OTN) at http://www.oracle.com/technetwork/middleware/ias/downloads/wls-plugins-096117.html.
After you go to the above site and accept the license agreement, you can click on link "Oracle WebLogic Web Server Plugins 11g" to download a zip file with the latest plug-ins
After you download the above zip file, check if it contains an Apache plug-in file for your Operating System. Example "WLSPlugin11g-64bit-Apache2.2-linux64-x86_64" is the file for Apache 2.2 on Linux
b. If there was not a 11g plug-in available for your OS, then you will need to use the 10g Plug-in (which will be covered in step#5 below)
STEP 3: Determine which Apache Web Server Version should be Installed for your OS Platform.
To determine which Apache Web Server versions can be used in your environment, do the following:a. Go to the following link which will open a spreadsheet: http://www.oracle.com/technetwork/middleware/downloads/fmw-11gr1certmatrix.xls
b. On the spreadsheet, go to tab "FMW on WLS - WebServers"
c. This spreadsheet shows the Apache versions supported based on the plug-in you are using.
d. Depending on the plug-in version that you are using (as determined by STEP 2 above), you will need to go to column "WebLogic Server Plug-in 1.1" (aka WebLogic11g) or go to column "WebLogic Server Plug-in 1.0" (aka WebLogic 10 g)
e. You will then see a list of all Web Servers/Versions that are supported. Check which Apache version(s) are supported, so that you know what you need to download and install.
STEP 4: Download and Install Apache.
You can download and install the Apache HTTP server using the following link:http://www.apache.org/dist/httpd/
From the above link, you may want to click 'Current Releases' which will direct you to a HTTP Server Download page which shows best available version.
For Windows, you may wish to choose the 'binary' download file. Note that there are different files to download depending on whether or not you are installing SSL on Apache.
The following link contains additional detail on installing Apache on Windows:
http://httpd.apache.org/docs/2.2/platform/windows.html
For Unix, you need to install 'source' download file. Refer to the following link for details on installing Apache on Unix:
http://httpd.apache.org/docs/2.2/
STEP 5: Install the Apache WebLogic Plug-in
Below are instructions for installing each plug-in version.
Instructions to Install 10g Plug-In (formerly version 1.0 Plug-in):
The 1.0 plug-in files are delivered with WebLogic 10.3.x. To get the necessary plug-in for your Apache RPS, do the following:
1. Go to the directory where you installed WebLogic (ie WL_HOME)
2. Then go to subdirectory wlserver_10.3/server/plugin/
3. Then go to the appropriate subdirectory based on the OS/Platform for your Apache RPS installation.
4. You will see several plug-in files. For Apache 2.2.x, you need to use one of the following plug-ins:
a. If using http protocol when proxying requests to WebLogic: Use file mod_wl_22.so
b. If using https protocol when proxying requests to WebLogic: Use file mod_wl128_22.so
5. After you locate the plug-in file, copy the file to the 'modules' directory in your Apache install directory. Example:
Copy mod_wl_22.so to <APACHE_HOME>/modules
Note: Another option, to get the latest plug-in file, for version 1.0, is to download it from 'My Oracle Support'. This can be done as follows:
1. First download the file as follows:
a. Log into My Oracle Support (MOS)
b. Go to the 'Patches & Updates' tab
c. In the 'Patch Search' section:
i. Enter patch#10051798
ii. Click 'Search' button
iii. The patch will be displayed. Click on the hyperlink and then click 'download' button to download the plug-in files.
2. Now, unzip the file you just downloaded and go to the appropriate directory based on your Apache OS and Apache version you are installing.
3. Extract the file for your Apache version and OS.
a. If using http protocol when proxying requests to WebLogic: Extract file mod_wl_22.so
b. If using https protocol when proxying requests to WebLogic: Extract file mod_wl128_22.so
4. Copy the file to <APACHE_HOME>/modules
Instructions to Install 11g Plug-In (formerly version 1.1 Plug-in):
a. Unzip the plug-in file (from STEP 2 above).
You might want to create a new directory (eg PlugIn11g) in <apache-install-dir>/plugins. Then unzip the plug-in file to directory 'weblogic-plugins-1.1'
b. There will be a 'README.txt' file included in the zip file. Follow the instructions in the 'README.txt' file to install the plug-in.
You will also need to refer to the README file for the next step ("How to configure Apache with WebLogic Plug-in)
Note: If using the 11g Plug-in, you may want to copy the plug-in files (from the plug-in lib directory) directly to <iApache-install-dir>/lib, as noted in the README file.
STEP 6: Configure Apache with WebLogic Plug-in
The primary configuration file, for Apache, is the 'httpd.conf' file which is located in your Apache install directory:APACHE_HOME\conf\httpd.confMake the following changes to the 'httpd.conf' file:
1. First, add a line to load the WebLogic plug-in file. There is a section, in httpd.conf, where all the modules are loaded. You can add a line to the end of this section, for the WebLogic plug-in module. Note that the name of plug-in file will differ depending on what plug-in version you are using (as outlined in the previous step). So add the line as follows:
-If using Plug-In version 1.1, add line:
LoadModule weblogic_module weblogic-plug-ins-1.1\mod_wl.so
-If using Plug-In version 1.0 and configuring Apache plug-in to use SSL, add line:
LoadModule weblogic_module modules\mod_wl128_22.so
-If using Plug-In version 1.0 and NOT configuring Apache plug-in to use SSL, add line:
LoadModule weblogic_module modules\mod_wl_22.so
2. Next, add an 'IfModule mod_weblogic.c' section to the end of the httpd.conf file (where the other 'IfModule' sections are). This section will contain information on how to forward incoming requests to the WebLogic server.
The following link contains information on all parameters that can be used with the Apache plug-in for WebLogic:
http://download.oracle.com/docs/cd/E12840_01/wls/docs103/plugins/plugin_params.html#wp1143055
The remainder of this section contains several sample Apache Configurations and the corresponding values to use in the 'mod_weblogic.c' section (in httpd.conf). You might want to first start out with a simple configuration (Example 1) and get that working before moving on to a more complex configuration
EXAMPLE 1: Apache configuration using one PIA (and no SSL)
In this example, Apache is proxying all requests to just one WebLogic PIA located on on web server box "wlmachine" listening on port 8000:
<IfModule mod_weblogic.c>
WebLogicHost wlmachine
WebLogicPort 8000
MatchExpression /
</IfModule>
WebLogicHost wlmachine
WebLogicPort 8000
MatchExpression /
</IfModule>
EXAMPLE 2: Apache configuration using two PIA's (and no SSL)
In this example, Apache is proxying requests to multiple WebLogic PIA's: Requests are being forwarded to PIA's listening on ports 8000 and 8001 on web server box "wlmachine".
Note that if you are forwarding requests to multiple PIA's, you must specify the cookie name in the Apache httpd.conf file, as in the example below. The same cookie name value must be specified in Apache configuration file (httpd.conf) and WebLogic configuration file (PS_HOME\webserv\<DOMAIN_NAME>\applications\peoplesoft\PORTAL.war\WEB-INF\weblogic.xml) for each PIA that Apache is sending requests to:
<IfModule mod_weblogic.c>
WebLogicCluster wlmachine:8001,wlmachine:8000
MatchExpression /
WLCookieName PORTAL-PSJSESSIONID
</IfModule>
WebLogicCluster wlmachine:8001,wlmachine:8000
MatchExpression /
WLCookieName PORTAL-PSJSESSIONID
</IfModule>
EXAMPLE 3: Apache configuration with debug logging enabled
To collect more detail on Apache activity, you can turn on debug logging, using parameters 'Debug ON' and 'DebugConfigInfo On' as in the example below. In this example, the debug information, for the plug-in, is logged to file c:/tmp/wls_plugin.log:
<IfModule mod_weblogic.c>
WebLogicCluster wlmachine1:8000,wlmachine2:8000
MatchExpression /
WLCookieName PORTAL-PSJSESSIONID
Debug ON
DebugConfigInfo On
WLLogFile c:/tmp/wls_plugin.log
</IfModule>
WebLogicCluster wlmachine1:8000,wlmachine2:8000
MatchExpression /
WLCookieName PORTAL-PSJSESSIONID
Debug ON
DebugConfigInfo On
WLLogFile c:/tmp/wls_plugin.log
</IfModule>
EXAMPLE 4: Apache configuration using two SSL-enabled PIA's
If Apache is proxying requests to an SSL-enabled PIA, then you must also use parameter "SecureProxy ON" and you need to specify the location of the trusted root CA, that Apache needs to complete the SSL handshake with the WebLogic PIA. The parameters that you use, are different, based on whether you are using plug-in 1.0 or plug-in 1.1. Below are the steps for configuring the plug-in to communicate to the WebLogic PIA via https protocol:
1. First, you will need to get the root certificate for the server certificate that the WebLogic PIA is using (this step applies for both Plug-in versions 1.0 and 1.1). If you do not have the root certificate for the WebLogic PIA, refer to the following document for instructions on how to obtain the root certificate:
http://middlewaretimes.blogspot.com/2014/09/how-to-extract-root-ca-from-server.html
At the end of this step, you should have the root certificate in a file. The contents of the root file, will look something like this:
-----BEGIN CERTIFICATE-----
MIIEJjCCA4+gAwIBAgIQMFbEDgfLmZFFDDT15K+BYDANBgkqhkiG9w0BAQUFADCB
vjD68zPGvIgVDGwnY/uJx2sZi6hLeK5N+Zv5X2nKr1FlLim6fg/mpexm6xY3VIsyza
Gm72Yp2GEbnbCQ==
-----END CERTIFICATE----
MIIEJjCCA4+gAwIBAgIQMFbEDgfLmZFFDDT15K+BYDANBgkqhkiG9w0BAQUFADCB
vjD68zPGvIgVDGwnY/uJx2sZi6hLeK5N+Zv5X2nKr1FlLim6fg/mpexm6xY3VIsyza
Gm72Yp2GEbnbCQ==
-----END CERTIFICATE----
Note: If your certificate uses both a root and intermediate certificate, then the above file should contain both: first the intermediate certificate followed by the root certificate.
2. Next, you will need to change the httpd.conf configuration.
For 10g Plug-In (ie version 1.0):
a. Place the root certificate file (from the step 1 above) in a directory within APACHE_HOME. In this example, the root file is called "root.cer" and located in <APACHE_HOME>/conf/Certs/
b. Now, add parameter 'SecureProxy ON' to the WebLogic section in httpd.conf. Also, add parameter 'TrustedCAFile and specify the location of the root certificate. Also, the WebLogic ports that you specify, will need to access https ports. Example:
<IfModule mod_weblogic.c>
SecureProxy ON
TrustedCAFile "C:/Program Files/Apache Software Foundation/Apache2.2/conf/Certs/root.cer"
WebLogicCluster wlmachine1:443,wlmachine2:443
MatchExpression /
WLCookieName PORTAL-PSJSESSIONID
Debug ON
DebugConfigInfo On
WLLogFile c:/tmp/wls_plugin.log
</IfModule>
SecureProxy ON
TrustedCAFile "C:/Program Files/Apache Software Foundation/Apache2.2/conf/Certs/root.cer"
WebLogicCluster wlmachine1:443,wlmachine2:443
MatchExpression /
WLCookieName PORTAL-PSJSESSIONID
Debug ON
DebugConfigInfo On
WLLogFile c:/tmp/wls_plugin.log
</IfModule>
For 11g Plug-In (ie version 1.1):
Place the root certificate file (from step 1 above) in an "Oracle Wallet". Below are the instructions for creating the Oracle Wallet:
1. Go to <APACHE_HOME>/weblogic-plugins-1.1/bin
2. Set the path point to a JDK6. Example
PATH = d:\WLS1033\jdk160_18\jre\bin;%PATH%
3. Set the CLASSPATH to reference the jar file in <APACHE_HOME>/weblogic-plugins-1.1/jlib /oraclepki.jar. Example
SET CLASSPATH=C:\Program Files\Apache Software Foundation\Apache2.2\weblogic-plugins-1.1\jlib\oraclepki.jar
4. Run the following command to create a wallet:
java oracle.security.pki.textui.OraclePKITextUI wallet create -wallet my-wallet -auto_login_only
5. Now add your root certificate file, to the wallet. Example:
java oracle.security.pki.textui.OraclePKITextUI wallet add -wallet my-wallet -trusted_cert -cert "C:\Program Files\Apache Software Foundation\Apache2.2\conf\Certs\root.cer" -auto_login_only
6. Now, add parameter 'SecureProxy ON' to the WebLogic section in httpd.conf. Also, add parameter 'WLSSLWallet' and specify the path location of the Oracle Wallet containing the root certificate. Also, the WebLogic ports that you specify, will need to access https ports. Example:
<IfModule mod_weblogic.c>
SecureProxy ON
WLSSLWallet="C:\Program Files\Apache Software Foundation\Apache2.2\weblogic-plugins-1.1\bin\my-wallet\"
WebLogicCluster wlmachine1:443,wlmachine2:443
MatchExpression /
WLCookieName PORTAL-PSJSESSIONID
Debug ON
DebugConfigInfo On
WLLogFile c:/tmp/wls_plugin.log
</IfModule>
SecureProxy ON
WLSSLWallet="C:\Program Files\Apache Software Foundation\Apache2.2\weblogic-plugins-1.1\bin\my-wallet\"
WebLogicCluster wlmachine1:443,wlmachine2:443
MatchExpression /
WLCookieName PORTAL-PSJSESSIONID
Debug ON
DebugConfigInfo On
WLLogFile c:/tmp/wls_plugin.log
</IfModule>
Note: On Linux/Unix platforms, do not use the "=" in the WLSSLWallet parameter. Example: WLSSLWallet /opt/Apache22/weblogic-plugins-1.1/bin/my-wallet/
7. When starting Apache, you'll need to make certain that the plug-in libraries are available:
For Windows, make certain that <APACHE_HOME>\weblogic-plugins-1.1 is in included in the PATH. Example:
PATH = C:\Program Files\Apache Software Foundation\Apache2.2\weblogic-plugins-1.1\lib;%PATH%
For Unix/Linux, include ${PLUGIN_HOME}/lib in the LD_LIBRARY_PATH
(other options include copying the 'lib' contents to APACHE_HOME\lib)
STEP 7: Configure WebLogic to use "WebLogic Plugin Enabled" option:
When using a web server plug-in, we recommend that you set the 'WebLogic Plugin Enabled' parameter, as there are a few known issues when not setting this parameter, especially if using https. This parameter can be set as follows:a. Log into WebLogic console (using url http://machine-name:port#/console/)
b. Click 'Lock & Edit' button on top left page
c. From left menu, choose Environment -> Servers
d. Click the 'PIA' hyperlink on right menu.
e. Go to tab 'Configuration' and sub-tab 'General'
f. At bottom of page, click the 'Advanced' hyperlink
g. Check box next to 'WebLogic Plug-In Enabled
h. Save change
i. Click 'Activate Changes' button on top left page
STEP 8: Test the Apache Configuration
Below are steps to test the Apache configuration:
1. First you, should test direct access to the WebLogic PIA to make certain it is accessible. When you initially test, you may want to configure your WebLogic PIA to use a web profile that does NOT have an authentication domain or virtual addressing configured. (just to rule out any issues with misconfigured Web Profile).
To test direct access to the WebLogic PIA, log into the PeopleSoft application, from a browser, using WebLogic PIA/Port# in the url. Example:
http://websvr:8000/ps/signon.html
2. Next you should verify that the Apache proxy is up and running (httpd -k start). If you made any configuration changes, be sure to shut down Apache and restart it.
You can run "netstat -an" to verify that the Apache server is listening on the port that you configured for the RPS
3. Now try accessing the PeopleSoft application, via the Apache RPS. Example:
http://ApacheSvr/ps/signon.html


 on WebLogic 10.3.x)
0 Comments